ISTE Certification – 2019

D9wrGkTWkAM9THx.jpg

Photo:  Mine 🙂 

Last weekend, I participated in a 2-day training towards becoming an ISTE Certified Educator.  I wanted to do this because I was reaching a point in my professional practice where I needed to rethink how I approached my work with teachers,  reflect on my teaching practices and strategize how our entire school could engage with and reflect on best teaching practices which include technology.  I also am very much looking forward to experiences which will help me prepare for future leadership opportunities.

The wonderful thing about this certification is that it totally is not about technology.  Does it include technology?  Of course it does, but the focus is on sound pedagogy, sound instructional choices and sound delivery and engagement practices.  The ISTE Certification program engages educators in the habits of strategically using technology for teaching and learning.

One of the things I liked most about it was meeting my “tribe”.  I decided to pursue this certification with Eduscape, who offers professional learning opportunities both nationally and internationally.  My “tribe” members were from various parts of the US and beyond.  The Phillippines was in the house, along with Peru and Brazil!  My facilitators @mrsmhebert and @mikeW1016 were terrific, engaging, approachable, and smart!  They were able to keep a group of about 40 educators engaged and energized over two eight hour days!  Often, I find it challenging to connect with my online learning community when the community is initiated online, not that those are not effective.  Meeting my cohort in person first however, provided a meaningful context for the relationships I know I will build and maintain going forward.  Another thing I liked is that the certification process is not only device and tool agnostic, but vendor neutral.  There was no one attempting to sell another product, tool, or service to our group.

D9xqMmnXYAA5xK4

Photo:  Marcia Hebert

I am confident the program will assist me in rethinking and redesigning much of my existing teaching and assist me with recreating learning activities with technology to engage my students in learning that is meaningful, relevant and authentic to their lives.

D9xBbDCWkAEEzbC

Oh! And I even won a free-registration for the 2020 ISTE Conference held in Anaheim, next year!  If you’re interested in learning more, check out ISTE’s Certification page or Eduscape.  Hit me up if you’d like to chat more about the experience! 🙂


Check out my first post with Boom Writer!


Start with the Why

Simon Sinek in his book, Start with Why, explains the “WHY” as “the purpose, cause or belief that drives every one of us.” As an Educational Technology leader, this is one question I constantly wrestle with when considering technology adoption and implementation efforts. “Why have we selected this device?”, “Why is this tool a preferred choice over another?”, or “Why is this important now?”. When questions like these are addressed the “how” doesn’t necessarily become easier, but it certainly can become more clear.

When technology becomes an extension of what naturally occurs in the classroom, it can serve as a transformative learning tool. Its’ integration should be seamless, and to some degree invisible. Educational technologies should aid in diminishing barriers, provide a platform to develop agency, and provide access to new types of interactions and not merely serve as a digital substitute for a previous learning routine.

While I could give you a list of 10 steps or questions one must ask when thinking about how to adopt a learning technology, what follows are a few key considerations one might take when thinking about how to integrate technology into pedagogy. After considering your “Why’s?”, familiarize yourself with a few trusted teaching frameworks that set forth what effective technology integration considers and looks like.

After Your Why – Explore Teaching Frameworks

In what ways can technology transform learning in a way that was previously unachievable? One approach, the SAMR model, seeks to provide a framework.

SAMR, an acronym standing for Substitution – Augmentation – Modification – Redefinition is a teaching and learning framework developed by Ruben R. Puentedura, with the Maine Learning Technology Initiative support team, which provides guidance on the selection, use, and evaluation of technology. The Model evaluates learning tasks incorporating technology on a continuum from tasks which merely substitute technology to increasingly more sophisticated tasks which redefine the learning experience. It seeks to address the question of whether the technology has increased the depth of learning experienced by the student. Though the SAMR model has its’ critics, I find it to be a starting point in your journey.

TPack, another model, attempts to identify the convergence of technological, pedagogical and content knowledge needed by teachers when integrating technology.

In addition to these two, the LoTi Framework is another one worth mentioning and also focuses on the use of digital resources in engagement and higher-order thinking.

Accept That Not All Technology is Created Equally

When thinking about how to integrate technology into pedagogy, one should accept that not all technology integration efforts, devices or tools are created equally. Simply because School A’s tech is awesome or cool, doesn’t necessarily mean it will look the same in your school. There is no one best methodology or approach that works for the many complexities found across different learning environments. Instead, technology decisions should be customized and made with a specific context in mind, one which honors the specific day-to-day and longer term learning needs of students. When thinking about how to integrate technology, educators should evaluate technology tools using a vetting process. For example, Kathy Schrock recommends app evaluation rubrics when considering a new app or tool. The same would be true for device selection There are many online resources that walk educators through such a process. One such tool, Graphite, from Common Sense Media provides educators with ratings and educator reviews based on rubrics. Decisions made based on whether the tool is engaging, easy to use, can promote student agency, and increases the complexity of the learning tasks and depth of learning concepts is a winner!

3D designvirtual realitymindmapspodcasts and videos are all examples which not only promote engagement, but depth of learning as well.

Tools to Boost Literacy

When evaluating tools, educators should prioritize the use of apps or tools which are trans-discipline in nature, apps which can be used across an array of subjects and disciplines. Many devices offer native applications by way of cameras, audio recorders and more. For example, the iPad’s native applications help foster literacy with text to speech options, a web browser reader and vocabulary support with dictionary features.

For students requiring additional writing support, teachers can leverage these free tools:

  • Read and Write for Google Chrome – supports reading and writing across the curriculum, all with supports for Google Docs, PDF’s, ePubs and Kurzweil files.
  • Writing SAS Navigator – a scaffolded approach to writing, Writing SAS Navigator guides students through the process of writing from planning to publishing
  • BoomWriter – this Google for Education Partner packs a powerful punch by including a collaborative story writing tool and vocabulary development module. There are even standards-aligned rubrics for grading!

In addition to these, having your students write for an authentic audience is one of many impactful ways to bolster literacy and now has become immensely easy with collaborative writing tools like Google Docs and Office 365.

So when thinking of how to integrate technology, answer your “Why?” and then, start small, evaluate your tools, explore a variety of frameworks and don’t forget to collect and analyze data along the way to measure the impact on student learning. I’d enjoy the chance to hear from you. How do you currently integrate technology and what practical steps might you consider after reading his article? What have you found to be helpful and why?

Student Use of Images and Copyright


When working with students on a project including digital media in the form of images, I like to emphasize that students need and should include attribution for any of the work they use.  Students should also be encouraged to create their own images and/or drawings, to which they reserve the rights to.  Quite often though, Google Images becomes the destination of choice when searching for images.  While the destination of choice for so many, I find that many students are not familiar with the Advanced Image Search strategies or how to reverse search an image.

While there is nothing inherently wrong with Google Images, there are also other sources for high-quality images, many of which do not require attribution.  This infographic (click to enlarge) will lay out for you how to reverse search an image and how to use the advanced search features of Google Images.


Other amazing image sources:

Screen Shot 2019-02-28 at 10.43.43 AM


Unsplash
Creative Commons
Photos for Class
StockSnap
Good Free Photos
Foodiesfeed

I also want to share Jennifer Gonzalez’s Cult of Pedagogy extensive resource on Teaching Students to Legally Use Images Online.  If your students will be preparing for a project which includes the use of images, I would be happy to visit your class to work with them on this very important topic.

Sources:
https://www.educatorstechnology.com/2017/03/important-google-image-search-tips-for.html
https://www.cultofpedagogy.com/online-images/

Podcasts as Learning Tools

Increasing in popularity and scope, podcasts not only make a useful medium for a wide range of topics to be explored but can also serve as a dynamic teaching and learning tool, as well.

A podcast is an audio recording with spoken word delivered in an audio file format.  Podcasts can be played or downloaded to any phone or streamed to a computer or other mobile device.  Varying in length from anywhere between 10 minutes and an hour, podcast length can also be influenced by the host, audience engagement, and the topics covered.

Educators can use podcasts to:

  • reinforce classroom discussions or explore other topics of interest
  • assign homework listening sessions for written reflections
  • Language teachers could use podcasts to help students with pronouncing words and developing listening skills.
  • record lectures
  • create episodes based on course content themes
  • the possibilities are endless!

Students can create podcasts to:

  • create and share a narrative
  • tell their story or the stories of others
  • document a field trip
  • share book reviews
  • document their learning and growth over the year as part of a digital portfolio
  • articulate their understanding of complicated or difficult to grasp concepts
  • conduct interviews with subject matter experts or community members
  • explain a process or procedure
  • submit a writing project – essay, poetry collection or how to guide


Anchor  – This fun tool allows free recording and hosting from anywhere.  Creators can build episodes based on themes and previous segments.  Anchor even includes creative editing tools like sound effects, backgrounds, transitions, and more.  Music clips from Apple Music and Spotify also play nicely with the Anchor editing tool, for easy uploading and use and can be distributed using an RSS feed, which could easily be embedded on your onCampus class page.

Resources:

Why Your Students Need a Podcast
Cult of Pedagogy Teacher’s Guide to Tech

Ten Google Apps & Extensions for Teaching and Learning

Image source:  giphy

Happy Media Literacy Week!  Check out the Newseum’s site for additional resources.

Before jumping into a few of what I have found to be useful extensions for teaching and learning, it might be helpful to briefly explain what an “extension” is.  Extensions are lines of code that run within a browser that “extend” the functionality of the browser.  Here are just a few additional things you should also know about extensions:

  • The more extensions you have, the slower your browser will become
  • The extensions travel with you as long as you are signed into the Chrome browser.  FYI… Being signed into your Google Account and the Chrome Browser are 2 distinct actions.
  • You can modify or remove extensions by visiting the Chrome Web Store.

Extensions:

  1. Extensity – Manages extensions in your toolbar
  2. Loom – Video Recorder: Screen, Webcam and Mic
  3. Drive Slides – Create a Google Slides presentation from images contained in a Drive Folder
  4. Google Docs Quick Create – Quickly create Google Docs from your Browser bar
  5. Google Keep – Easily curate and organize materials on the web, as well as create lists
  6. Kaizena – Give verbal feedback on student work
  7. One Tab – Converts all your tabs into a list that can be saved, edited and shared
  8. Tab Resize – Split-screen layout on Chrome

Apps:

  1. Newsela – Daily news sources from the Associated Press, Washington Post, Scientific American, the Smithsonian, the King Center, biography.com and more!
  2. Desmos Graphing Calculator – Plot functions, create tables, animate graphs

If you wish to unsubscribe, click here:  unsubscribe from this list.

You can also follow our new and growing social media feed, found on Facebook, Instagram and Twitter at @staedtech as well as your preferences or unsubscribe by clicking here:  update your preferences orunsubscribe from this list.  Email preferences can also found at the bottom of this email in the black box.

Spatial Thinking with Google Maps and Beyond…

18 Ways to Use Google Maps in the Classroom 

In this last newsletter exploring the intersection between mapping and geography, I wanted to share one final resource in the form of Google Maps.

What is Google Maps?
Of course, many of us have likely used Google Maps to quickly locate a destination or to pull up driving directions.  But with Google Maps, you and your students can become arm-chair explorers and cartographers with ease. Google Maps are a fun and visual way to help students understand geography concepts, map reading, location, and distance measurement. Besides using Google Maps to teach the fundamentals of mapping, you can inspire students to investigate the world and to think spatially. Here are just a few of examples of the ways Google Maps can be used by discipline:

Art:

English:

History:

Math:

Modern Languages:

Science:

Sources:


If you wish to unsubscribe, click here:  unsubscribe from this list.

You can also follow our new and growing social media feed, found on Facebook, Instagram and Twitter at @staedtech as well as your preferences or unsubscribe by clicking here:  update your preferences or unsubscribe from this list.  Email preferences can also found at the bottom of this email in the black box.  

Schedule an Appointment

Storytelling with Google Lit Trips

What is a Google Lit Trip?

“Lit Trips are downloadable files that mark the journeys of characters from famous literature on the surface of Google Earth. Along the way, placemarks with pop-up windows contain “just in time” resources including relevant media, thought-provoking discussion starters, and links to supplementary information about “real world” references in that portion of the story.”  (Welcome to GLT. (2018). Retrieved from http://www.googlelittrips.org/ )
Google Lit Trips can deepen learners’ understanding of a story, as well as aid in developing empathy.  Creating and experiencing a Google Lit Trip can stretch student perceptions of the world in new and unique ways.

For an alphabetical list of Google Lit Trip examples, visit the following link:  Google Lit Trip Library

There you will find titles like:  MacBeth, In Search of Beowulf, Portrait of an Artist as a Young Man, WWII Locations: Farewell to Manzanar, Hiroshima, and Night, The Odyssey, A Long Walk to Water, Bud, Not Buddy and many more!

If you wish to unsubscribe, click here:  unsubscribe from this list.

You can also follow our new and growing social media feed, found on Facebook, Instagram and Twitter at @staedtech as well as your preferences or unsubscribe by clicking here:  update your preferences or unsubscribe from this list.  Email preferences can also found at the bottom of this email in the black box.

Schedule an Appointment

Digital Citizenship Week 2018

Every year, the third week of October is dedicated to teaching good digital citizenship in hopes that all students will become safe and smart when using technology.  Every day this week during lunch, a few of the boys in Form II have been sharing a tip that serves as a reminder of what it means to be a connected, conscientious digital citizen.

The tips covered this week will range from evaluating information and news sources, to understanding intellectual property, to adopting mindfulness around their digital footprint.  More importantly, the message to the boys has not been an “anti-tech” or fear-based message, but one which embraces the notion of “conscientious connectivity”, being mindful and aware of their online interactions.  In my role, I strive to encourage the boys to focus on the positive outcomes of technology when it is done well.

To provide some perspective into the work that has gone on across the Lower School in this area, here is a quick snapshot:

  • Form C – Digital Citizenship curriculum developed Summer 2018
  • Form B – Digital Citizenship curriculum developed and implemented SY 2017 – 18
  • Form A – Mini-lessons to be piloted during the Life Skills course
  • Form I – Mini-lessons piloted during Form Advisories
  • Form II – Mini-lessons piloted during Form Advisories

While a one-time discussion doesn’t address the need for ongoing dialogue around this topic, it is certainly a step in the right direction.  I welcome any feedback or suggestions that would make our efforts even more impactful.

For more information on Digital Citizenship Week, please see the following link from Common Sense Media.

If you wish to unsubscribe, click here:  unsubscribe from this list.

You can also follow our new and growing social media feed, found on Facebook, Instagram and Twitter at @staedtech.

You can also update your preferences or unsubscribe by clicking here:  update your preferences or unsubscribe from this list.  Email preferences can also found at the bottom of this email in the black box.

Schedule an Appointment

Storytelling and Creating Interactive Maps with Google Tour Builder

02eb4562-e217-46c5-a6d1-8990dbc10773


What is Google Tour Builder?
Google Tour Builder is a Google tool, which leverages Google Earth technology to allow users to create a story using geographic locations.  With Tour Builder, students use location and place to tell a story or to better convey the details of a literary work.

Here are a few examples of Google Tour Builder from across the curriculum:
The American Revolution
Ancient Egypt

Martin MacIntylre’s classes recently used this tool to explore Rivers within the US.  Here are a few examples:
Rio Grande
Snake River
Sacramento River

For more information see the following link or the video from Eric Curts, from ControlAltAchieve.com below.

If you wish to unsubscribe, click here:  unsubscribe from this list.

You can also follow our new and growing social media feed, found on Facebook, Instagram and Twitter at @staedtech.

You can also update your preferences or unsubscribe by clicking here:  update your preferences or unsubscribe from this list.  Email preferences can also found at the bottom of this email in the black box.

Use your own custom HTML
Google Tour Builder for any Subject – Presented by Eric Curts
Schedule an Appointment

Pi Anyone? Raspberry Pi, that is…

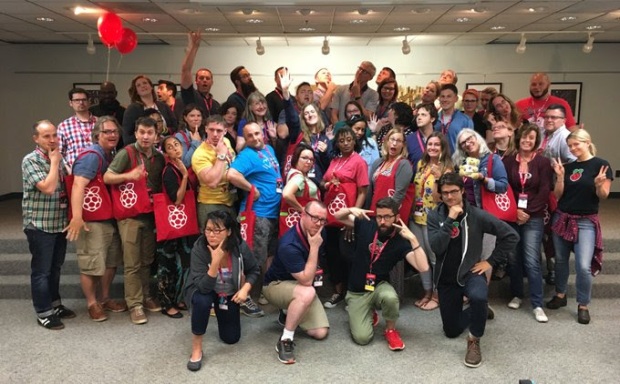
Last week I had the wonderful opportunity of attending the #picademy, sponsored by the Raspberry Pi Foundation, held in Ann Arbor, Michigan.  During this two-day workshop, 40 educators from all over came together to learn more about physical computing and just a few of the ways the Raspberry Pi 3 (RPi 3) could be used to foster creativity, problem-solving ability, and the maker mindset.  In groups, teachers collaborated on a variety of projects to include selfie photo-booths, sensing projects, and more.

The Raspberry Pi is an accessible and affordable computer, not to mention one in which can fit in the palm of your hand.  At a price point of $35/unit, it provides a neat way to put a programmable computer in the hands of your students.  Similar to a Windows or Mac OS, it runs the Raspbian OS, its own operating system.


Out of the box, I was able to quickly assemble and connect the Pi’s components.  Once connected, our rock star facilitators walked us through a few projects to get started with the Pi.  What I appreciated about this workshop was that there was no “sit and get”, within the first 20 – 30 minutes of Day 1, we were drafting, testing, and exploring new ideas on the Pi.  Though I learned much more than I had already known about the Pi, that wasn’t what made the workshop awesome… it was the confidence I gained in failing and trying new things beyond my reach and learning to leverage the wealth of resources around me, by way of the RPi Community and beyond.

Another thing I appreciated about the workshop is that I was able to walk away with something I had created.  During the workshop, we were tasked with coming up with a project idea that solves a problem we have and then organize ourselves in teams centered around that mission.

While brainstorming a few project ideas, I wanted to come up with something that would give students and teachers a way to quickly reflect, document and share their learning experiences.  One easily overlooked, but so very important practice in education is that of reflection and sharing.  A selfie/video-reflection photobox thingy (smile) is what my group and I came up with.  Inspiration from the @thenerdyteacher.  Recently, Instructables posted a nice write up for a Raspberry Pi Photo Booth Case… Check out that link here.


This slideshow requires JavaScript.

Of course, during the project development phase, we experienced some challenges, but that was to be expected.  Needless to say, the payoff was huge.  Not only were we able to develop an initial concept, but we now have some ideas of what to improve upon in our next iteration.  My team was fire (that means terrific, great, hot, etc.) and consisted of @ckillmer, @ra_stratton, @mkplyler , @afmcdnl and our Tweet Bot:  @RPCE_PhotoBomb.  Consider following them on twitter when you get a moment.


It did take us a while to get going, as we spent a great deal of time in the concept development and project management phases.  Our group-assigned team leader quickly assigned us roles and from there, we all just jumped in.  Two of us worked on a physical prototype of the photo booth, followed by my work in Python on the code for the Dropbox plug-in to automate the image delivery to a private Dropbox for vetting.  This is particularly important if you are concerned about the content your students may record.  Our group also had the work of drafting (borrowing) the code for the physical components and connections, i.e. the button wiring and designation in Python (wasn’t my part – LOL).  While that was going on, we also had another team member working on the Twitter API plug-in, which would provide users the opportunity to submit their image or video (after a preview), along with 140-character tweet on their subject. One of the initial thoughts here was to use this in a science class, where during labs, students could quickly record their reflections and 140-character tweets, all from their lab bench. Of course, this can and should be adopted in other disciplines and content areas.  What about a similar booth for a writing/ELA course where teachers allowed students to record their story endings, or in a language class, where teachers allow students to practice their dictation.

In short, I found this to be a low-cost and accessible way to outfit a class with portable recording stations/studios.  Many thanks to @thenerdyteacher for the inspiration and the entire RPi Team @ascollins, @mllevalsunshine, @mattrichardson, @olsonk408, and @cortlentz1 for all the knowledge and support they offered to move the idea forward…

IMG_2507.jpgIMG_2503.jpgIMG_2514.jpg

Til next time,

The Berknologist has spoken,.. Good night.